· Holt Ferris
How to Tie Your First Fly
I have taught a lot of people to tie their first fly: at a kitchen table, on a drift boat bench seat, once on a tailgate in a gas station parking lot before an early hatch. The setup is always the same — a vise, a hook, some thread, and a small handful of feathers and fur. None of it is complicated once you've done it a single time. This guide walks through exactly what I show a first-timer, in the order I show it, so you can go from an empty hook to a finished fly in one sitting.
What you need before you start
Get these together before you sit down. A fly tying vise to hold the hook steady, a bobbin holder loaded with thread, sharp fine-point scissors, and a whip finisher to close off the head. If you're starting from zero, our Complete Fly Tying Kit ($79.99) bundles the vise with a bobbin holder, whip finisher, hackle pliers, brushes, tweezers, and five spools of 100D/220yd thread — enough to tie dozens of flies before you need to restock anything.
For materials, a first Woolly Bugger needs just three things: a hook (size 8 or 10 is easiest to handle while you're learning), black marabou for the tail, black chenille for the body, and a webby black saddle hackle to palmer through it. All of that is available cheap at any fly shop or tying supplier — you don't need a full bench of dubbing and synthetics for fly number one.
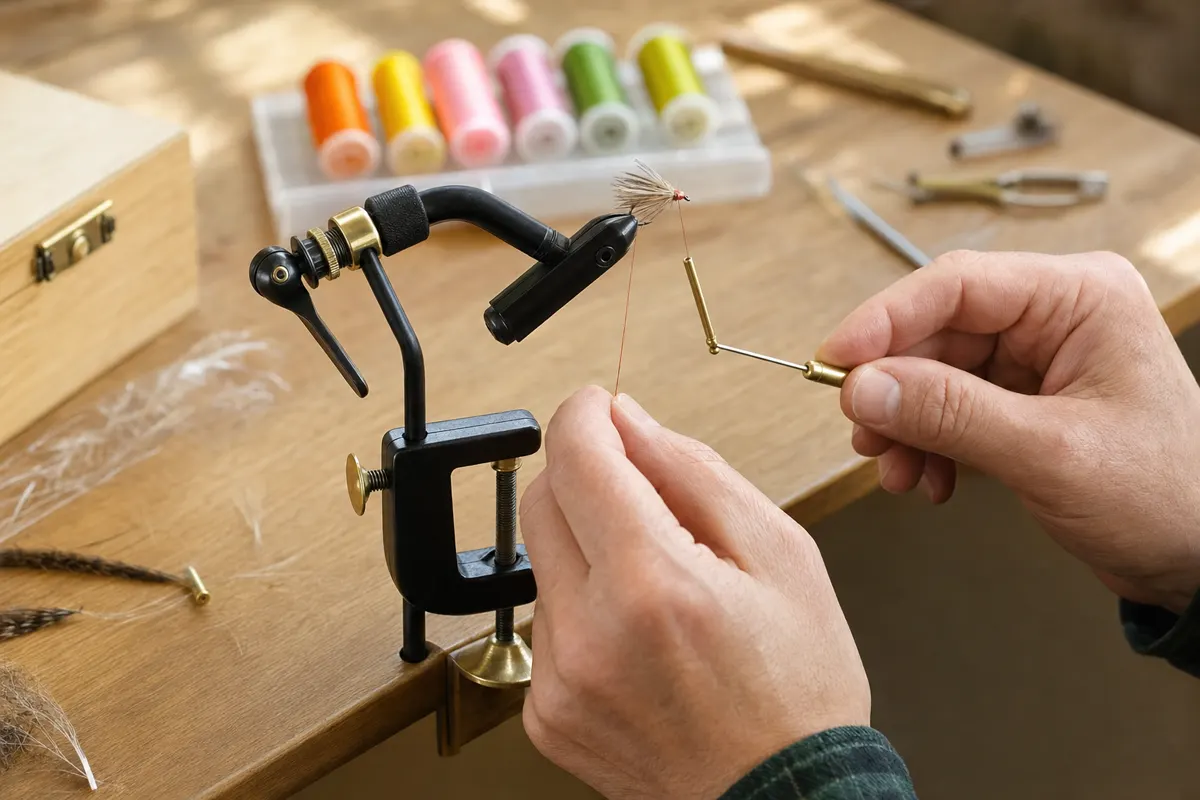
Hook sizes the Tailwater rotary vise jaws are built to hold
— Tailwater measurements, 2026
Step 1: Mount your vise and load the jaws
Slide the C-clamp under the edge of your desk or table and tighten it until the vise doesn't wobble when you push on the arm — see our fly tying desk guide if you're still deciding where to set up. Open the jaws, slip the hook in so the bend sits just past the jaw tips with the point facing you, and close the jaws down onto the shank, never the point. On a rotary vise like ours, the hardened-steel jaws ride on brass bushings, so once the hook is seated you can spin the whole fly 360° to check your wraps from every angle — a fixed vise won't let you do that without unclamping.
Step 2: Pick your hook and thread
For a first Woolly Bugger, match a 6/0 or 8/0 fly tying thread in black to your hook size. Thinner thread cuts into deer hair and delicate dries; for a size 8-10 streamer hook it holds plenty of strength without adding bulk. Load the spool into your bobbin holder and pull off a few inches of tag end to work with.
Step 3: Tie a Woolly Bugger, start to finish
- Start your thread. Anchor it behind the hook eye with a few wraps, then trim the tag.
- Tie in the tail. Measure a clump of marabou about a shank-length long, tie it in at the bend, and wrap thread forward to the mid-shank.
- Tie in the hackle. Strip the fluffy base off a saddle feather and tie it in by the tip at the same point, shiny side facing forward.
- Tie in the chenille. Strip a bit of fuzz off the tip, tie it in, and wind your thread forward to just behind the eye.
- Wrap the body. Wind the chenille forward in tight, touching turns to build the body, then tie it off and trim the excess.
- Palmer the hackle. Spiral the feather forward through the body in even turns. This is where the rotary function earns its keep — spin the fly to check that the hackle is even on the far side before you commit to the next wrap.
- Whip finish. Tie off the hackle, build a small neat head with thread, and use your whip finisher to lock it down before trimming.
That's a complete fly. It won't be perfectly even the first time, and that's fine — the second one will already look better, and by your tenth you'll have a rhythm.
Common first-fly mistakes
These four issues cover almost everything that trips up a beginner in the first hour on the vise.
| Mistake | Fix |
|---|---|
| Thread keeps snapping | Loosen bobbin tension and spin the bobbin to wrap instead of yanking it around the hook |
| Hook isn't seated well | Push the shank fully between the jaw tips before you close them; a loose hook will twist mid-wrap |
| Head gets bulky and crowded | Stop adding material earlier and leave a clean gap behind the eye for the whip finish |
| Hackle wraps look uneven | Use the vise's rotary spin to check all sides before you tie it off, not just the side facing you |
Cleaning up and storing your tools
Before you put everything away, brush any loose marabou or chenille fuzz off the vise jaws and desk, and back off the C-clamp a turn or two if you're not tying again the same day — it takes the tension off the desk edge without you needing to fully remove it. Wipe the jaws down if they've picked up wax from the thread, and store hooks and materials somewhere dry; damp storage is the fastest way to dull a hook point or mat down a good hackle feather before you ever get to use it.
What to tie next
Once a Woolly Bugger feels routine, move on to our beginner fly patterns guide for four more easy ties, including a Pheasant Tail Nymph and an Elk Hair Caddis. If you're building out a permanent tying spot, our fly tying desk guide covers lighting and storage, and our thread guide goes deeper on denier and color choice for patterns beyond the Bugger. Curious how a rotary vise actually compares to a fixed one on technique? See rotary vs. fixed vise. And if you want to read what other first-timers and guides think of the vise itself, our reviews page and how we test page cover the hands-on details.